In our fast-paced, screen-focused world, it’s easy to feel disconnected from our bodies. We sit at desks, in cars, and on couches, and day by day, a subtle stiffness creeps in. Our bodies “keep the score” of our daily stressors, and that tightness in our shoulders or ache in our lower back is more than just a physical complaint. It’s a sign of accumulated tension.
This physical tension is often a mirror for our mental state—a sign of stress held deep within our muscles. But what if you could gently unwind that tension in just a few minutes each day? You don’t need to be a gymnast to reap the rewards of a more limber body. This guide will walk you through gentle yoga poses to try at home for flexibility, helping you release tightness, restore your natural range of motion, and find a sense of spaciousness in both body and mind.
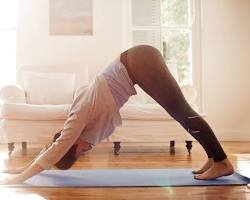
Table of Contents
Beyond Touching Your Toes: What Flexibility Really Means
When most people think of flexibility, they picture someone effortlessly folding into a human pretzel. But in yoga, true flexibility isn’t about achieving extreme postures. It’s about restoring the healthy, natural range of motion in your joints and releasing chronic tension stored in your muscles and connective tissues.
This process is deeply connected to your nervous system. When you’re stressed, your sympathetic nervous system (“fight-or-flight”) is activated, causing your muscles to subconsciously contract and tighten. Yoga, with its focus on slow movement and deep breathing, activates the parasympathetic nervous system (“rest-and-digest”). This sends a powerful signal to your body that it’s safe to relax, allowing your muscles to release their protective grip. As you breathe into a tight hamstring or gently open your hips, you’re not just stretching a muscle; you’re creating space for stress to dissolve. Physical openness often leads to mental clarity and emotional release, making a simple stretching routine a profound act of self-care.
Getting Started: Tips for a Safe and Mindful Practice
Before you step onto the mat, keep these principles in mind to ensure your practice is safe, enjoyable, and effective.
- Listen to Your Body: This is the most important rule. Learn to distinguish between the “good” sensation of a muscle stretching and the “bad” signal of pain. A stretch should feel like a gentle, warm pulling, but never sharp, shooting, or electrical. If you feel pain, you’ve gone too far. Ease back immediately.
- Breathe Deeply: Your breath is your most important tool and your guide. Inhale as you prepare or lengthen, and exhale as you deepen into a stretch. If your breathing becomes shallow or ragged, it’s a sign that you are pushing too hard. Deep, steady breaths calm the nervous system and give your muscles the oxygen they need to release.
- Use Props (DIY Edition): You don’t need expensive gear. A firm pillow or folded blanket can support your knees and hips. A stack of thick books can serve as a yoga block to bring the floor closer to you. A bathrobe tie or a towel can be used as a yoga strap to help you reach your feet in seated stretches.
- Consistency Over Intensity: A gentle 15-minute practice done daily will yield far better and safer results than a strenuous, painful hour-long session once a week. Be patient and consistent, and celebrate small improvements.
“For those who learn best by following along with a teacher, channels like Yoga With Adriene offer thousands of free, high-quality classes perfect for a home practice.”
7 Essential Yoga Poses to Try at Home for Flexibility
This sequence is designed to be a balanced, full-body routine that targets the most common areas of tightness. Hold each pose for 5-8 deep breaths, moving slowly and mindfully.
1. Cat-Cow (Marjaryasana-Bitilasana)
- Why it’s great: This dynamic movement is the perfect way to start. It gently warms up the body and increases the flexibility and awareness of the entire spine, from your tailbone to your neck.
- How to do it:
- Start on your hands and knees in a “tabletop” position, with your wrists under your shoulders and knees under your hips.
- Inhale as you drop your belly, lift your chest and tailbone, and look slightly forward (Cow Pose).
- Exhale as you press into your hands, round your spine toward the ceiling, and tuck your chin to your chest (Cat Pose).
- Continue flowing between Cat and Cow for 8-10 breath cycles.
- Benefits Beyond Flexibility: Gently tones the abdominal muscles and coordinates breath with movement, a foundational skill in yoga.
- Common Mistake: Rushing the movement. The goal is to move slowly, articulating each vertebra of the spine.
2. Downward-Facing Dog (Adho Mukha Svanasana)
- Why it’s great: This is a fantastic full-body stretch that targets the hamstrings, calves, shoulders, and spine all at once. It’s one of the best yoga poses for hamstrings.
- How to do it:
- From your tabletop position, tuck your toes and lift your hips up and back, forming an inverted “V” shape.
- Keep your hands shoulder-width apart and your feet hip-width apart.
- Gently “pedal” your feet, bending one knee and then the other, to slowly open up the backs of your legs.
- Let your head hang heavy to release any tension in your neck.
- Benefits Beyond Flexibility: Builds strength in the arms, shoulders, and wrists. It’s also a mild inversion, which can help calm the mind.
- Common Mistake: Trying to force your heels to the floor with straight legs, which causes the back to round. Prioritize a long, straight spine by keeping a generous bend in your knees.
3. Low Lunge (Anjaneyasana)
- Why it’s great: This pose is a deep stretch for the hip flexors, the muscles at the front of your hips that get notoriously tight from prolonged sitting.
- How to do it:
- From Downward-Facing Dog, step your right foot forward between your hands.
- Lower your left knee to the mat (use a blanket for padding if needed).
- Ensure your right knee is stacked directly over your right ankle.
- Place your hands on your right thigh and gently press your hips forward and down until you feel a stretch in the front of your left hip.
- Hold for 5-8 breaths, then switch sides.
- Benefits Beyond Flexibility: Stretches the quadriceps and can help improve balance and focus.
- Common Mistake: Letting the front knee drift past the ankle, which puts unnecessary pressure on the knee joint.
4. Pigeon Pose (Eka Pada Rajakapotasana) Modification
- Why it’s great: This is the ultimate pose for yoga for hip flexibility, targeting the deep glute muscles and outer hips where we often store emotional tension.
- How to do it:
- From a tabletop position, bring your right knee forward and place it behind your right wrist.
- Angle your right shin so your right foot is somewhere in front of your left hip.
- Slide your left leg straight back, keeping your hips square to the front of the mat.
- If this is too intense, stay upright. To deepen the stretch, walk your hands forward and lower your torso over your front leg.
- Hold for 5-8 breaths, then gently switch sides.
- Benefits Beyond Flexibility: Can provide significant relief for sciatica pain and is known for being an emotionally releasing pose.
- Common Mistake: Rolling onto the hip of the bent leg. Keep both hips level by placing a pillow or block under the hip for support.
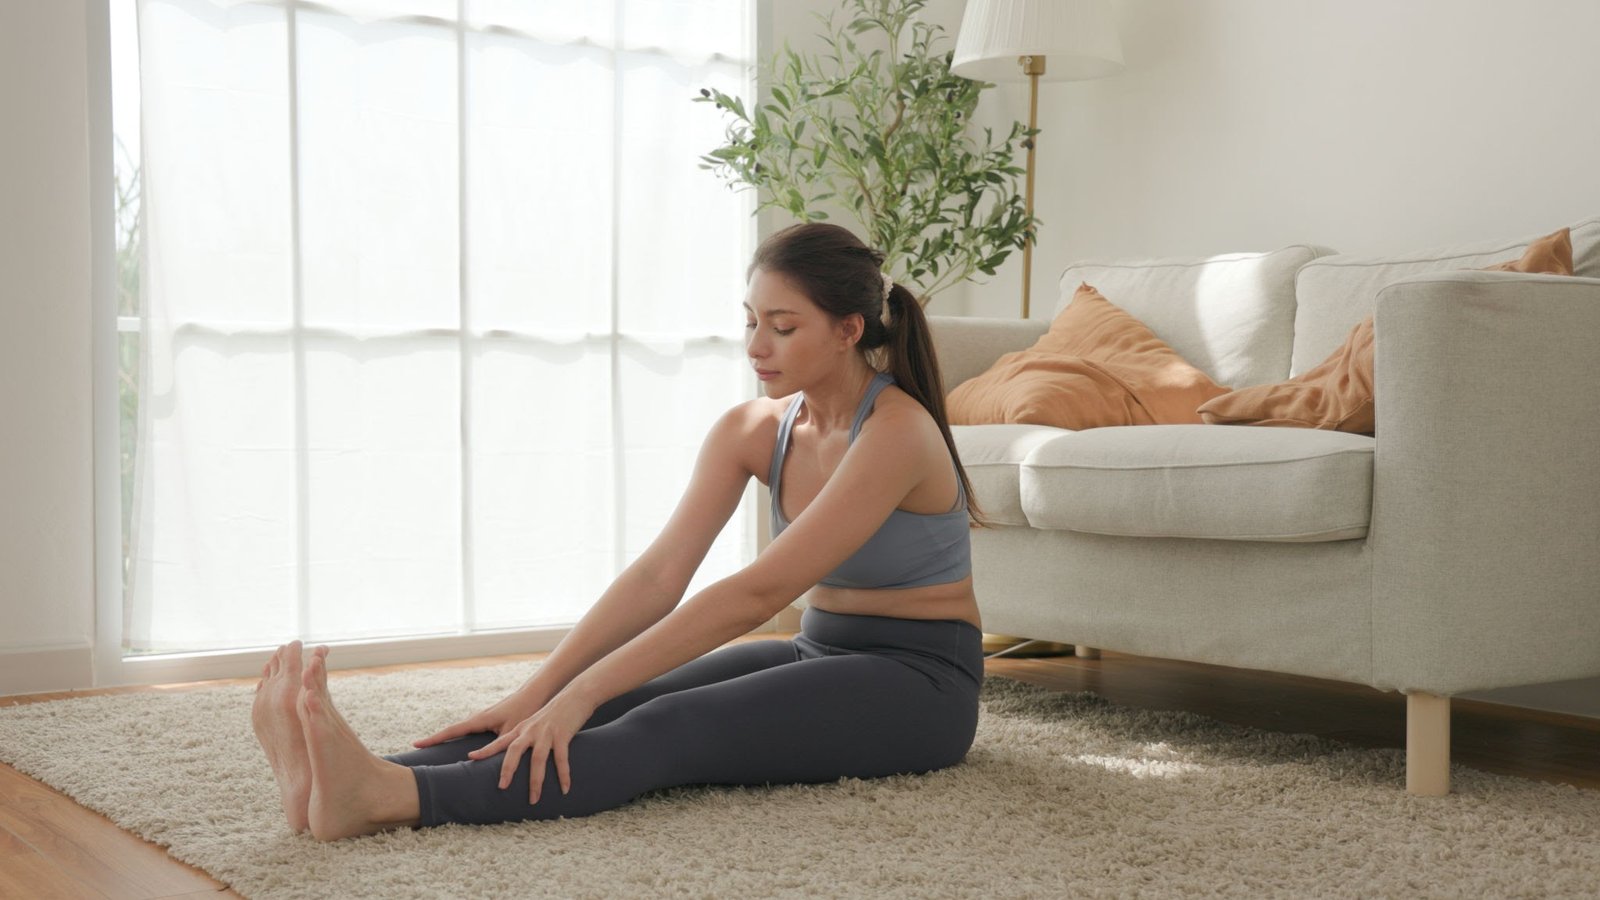
5. Seated Forward Bend (Paschimottanasana)
- Why it’s great: This calming pose provides a deep stretch for the entire back side of the body, especially the hamstrings and the lower back.
- How to do it:
- Sit on the floor with your legs extended straight in front of you.
- Sit on the edge of a folded blanket to help tilt your pelvis forward.
- Inhale and sit up tall, lengthening your spine.
- Exhale and begin to hinge forward from your hips, keeping your back as straight as possible.
- Rest your hands on your shins or feet, wherever they land comfortably.
- Benefits Beyond Flexibility: Calms the brain and helps relieve stress and mild anxiety. Stimulates the liver, kidneys, and ovaries.
- Common Mistake: Rounding the upper back to try and reach the toes. The goal is to lead with your chest, not your head.
6. Supine Spinal Twist (Supta Matsyendrasana)
- Why it’s great: A gentle twist is like hitting the reset button for your spine and central nervous system. It helps release tension in the back and aids in digestion.
- How to do it:
- Lie on your back and hug both knees into your chest.
- Extend your arms out to the sides in a “T” shape.
- Exhale and gently lower both knees to your right side.
- Turn your gaze to the left, if it feels comfortable for your neck.
- Focus on keeping both shoulder blades grounding down toward the floor.
- Hold for 5-8 breaths, then return to center and switch sides.
- Benefits Beyond Flexibility: Massages the abdominal organs, which can help with digestion and detoxification.
- Common Mistake: Letting the opposite shoulder lift far off the floor. It’s better to keep the shoulder down and not let the knees drop as far.
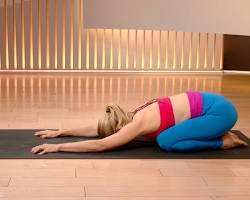
7. Child’s Pose (Balasana)
- Why it’s great: This is a resting pose that offers a gentle stretch for the hips, thighs, and lower back. It’s incredibly calming and a perfect way to end your practice.
- How to do it:
- Start in a tabletop position. Bring your big toes to touch and widen your knees slightly.
- Sit your hips back onto your heels.
- Fold your torso forward, resting your forehead on the mat.
- Your arms can be stretched forward or resting alongside your body.
- Benefits Beyond Flexibility: Gently relieves back and neck pain when the head is supported. It calms the mind and encourages introspective stillness.
- Common Mistake: Tensing the shoulders and neck. Actively release the muscles in your shoulders and allow your forehead to rest fully on the mat or a block.
Creating Your Daily Stretching Routine
You don’t need a full hour. Simply sequence these poses into a mindful flow.
- Morning Awakening Flow: Move more dynamically through Cat-Cow, hold Downward Dog and Low Lunge for 5 breaths each, and finish with a brief Seated Forward Bend to energize your body for the day.
- Evening Unwind Sequence: Hold each pose for a longer duration (8-10 breaths), focusing on the relaxing qualities of Pigeon Pose, the Spinal Twist, and ending with a long, supported Child’s Pose to prepare for sleep.
Frequently Asked Questions (FAQ)
- Q1: How long does it take to see results in flexibility?
- A: With a consistent practice (3-5 times per week), most beginners will notice a significant increase in their range of motion and a decrease in general stiffness within 2 to 4 weeks. Patience is key!
- Q2: Can I do this gentle yoga routine every day?
- A: Absolutely. This sequence is gentle enough for daily practice. Listening to your body is the most important part; if you feel particularly sore, you might take a day off or just hold Child’s Pose for a few minutes.
- Q3: What’s the difference between yoga and just stretching?
- A: While both improve flexibility, yoga intentionally links movement with conscious breathing (pranayama) and mindful awareness. This connection is what transforms simple stretching into a holistic practice that benefits both the mind and the body, reducing stress and increasing presence.
- Q4: Do I really need a yoga mat to start?
- A: No, you don’t! While a mat provides grip and cushioning, you can easily start on a carpeted floor or a large towel. The most important thing is to have a non-slip surface to practice safely.
Conclusion
Improving your flexibility is a journey of patience and self-kindness, not a destination. It’s a practice of showing up for yourself, breathing into discomfort with compassion, and slowly creating more space in your body and your life. By incorporating these simple yoga poses to try at home for flexibility, you are giving yourself a powerful gift of release, restoration, and profound self-care. Choose one pose, take five deep breaths, and begin today. Your body and mind will thank you.
Which of these poses is your favorite for releasing tension? We’d love to hear about your experience. Share your thoughts in the comments below and become part of the Unplugged Routine community!